Tools and Materials
- Drawing Software: Adobe Illustrator, Procreate, CorelDRAW, or free options like Inkscape and GIMP.
- Graphic Tablet: Optional, but helpful for more precise control.
- Reference Images: Photos of the subject for tracing and color reference.
- Color Palette: Predefined color palette for consistency in flat colors.
Steps to Create Poster-Style Portraits
- Select a Reference Image:
- Choose a clear, high-resolution image with good lighting and distinct features.
- Create a Basic Sketch:
- Import the reference image into your drawing software.
- Use the pen or brush tool to create a rough outline of the key features (face shape, eyes, nose, mouth, hair).
- Define Key Areas:
- Break down the portrait into simple shapes (circles, ovals, lines) to map out the main features.
- Focus on the overall composition and proportions.
- Outline with Clean Lines:
- Using the pen tool, trace over your sketch with clean, smooth lines.
- Aim for simplicity and clarity. Avoid too much detail; stick to essential lines that define the portrait.
- Apply Flat Colors:
- Create a new layer beneath your line art.
- Fill in different areas of the portrait with flat colors. Use the reference image to choose colors that represent shadows, mid-tones, and highlights, but keep them simple and non-gradient.
- Stick to a limited color palette to maintain the flat design style.
- Add Details and Adjustments:
- Add minimal details to bring out the personality of the subject (e.g., a few lines for hair texture or light shadows).
- Adjust the colors and lines to ensure the portrait is cohesive and visually appealing.
- Background and Composition:
- Choose a background color that complements the portrait.
- Add text or other graphic elements if the poster is for a specific event or purpose.
- Final Touches:
- Review your work and make any final adjustments to lines, colors, or composition.
- Ensure all elements are well-balanced and visually appealing.
Tips for Students
- Simplicity is Key: Focus on capturing the essence of the subject with minimal lines and colors.
- Consistency: Maintain a consistent style throughout the portrait to achieve a cohesive look.
- Practice: Experiment with different reference images and styles to improve their skills.
- Inspiration: Look at existing poster art and illustrations for ideas and techniques.
Example Project Outline
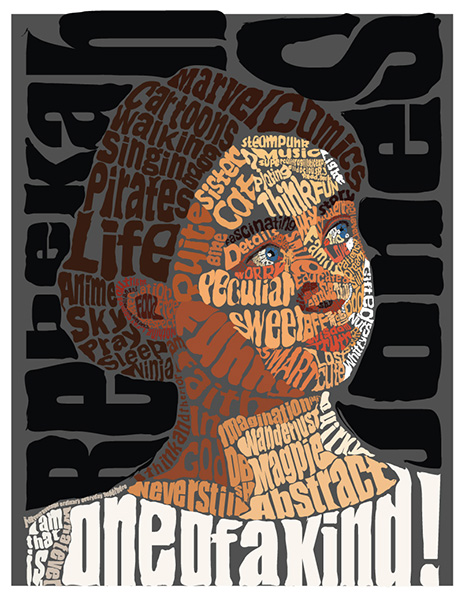
- Introduction to Flat Design:
- Brief history and examples of flat design in publishing and advertising.
- Analysis of different styles and techniques.
- Hands-On Practice:
- Select a subject for the portrait.
- Follow the step-by-step process to create the poster-style portrait.
- Critique and Feedback:
- Present their work to the class.
- Give and receive constructive feedback to improve their skills.
By following these steps, students will be able to create eye-catching poster-style portraits that are commonly used in publishing and advertising. This project will help them understand the importance of simplicity, color theory, and line work in graphic design.